HANDS-ON QUANTUM MECHANICS
Dean Zollman, Department of Physics, Kansas State University, (USA)
Introduction
Frequently, quantum mechanics is taught only at the end of a first physics course -- if it is taught at all. The reasoning is that quantum mechanics is a very abstract idea without much practical purpose. Therefore, the students can't understand it until they have learned all the rest of physics -- at least that is the assumption. We would like to change that way of thinking and have quantum mechanics integrated throughout the first physics course rather than just tacked on at the end. To make this change we have been developing a hands-on approach to learning and teaching quantum mechanics.
Before I describe the instructional materials, I will discuss our educational approach. The teaching model is very similar to the one that Beverly Taylor uses in her Physics of Toys materials. We certainly believe that students learn by doing; they do not learn by sitting in lectures. Concrete experiments come before the theory. Students do something first, so they have something to think about and explain. Application of the new concepts comes immediately after the theory. And, those applications should be hands-on and interactive in some way. We use an approach (called the learning cycle) that was developed by Robert Karplus many years ago. Basically we follow this format in everything that we do.
The students for whom we are aiming are middle to upper secondary school and beginning college students (approximately 14-19 years old). They have little science or math background and a low interest in science. We must have hands-on activities if this group is to study quantum mechanics. Our general goals, then, are to teach quantum mechanics to students who do not normally study it and to minimize both the mathematics and physics prerequisites.
We use computer visualization that is highly interactive as well as hands-on activities. The hands-on activities are with real stuff. Computer visualizations are still hands-on. The students' hands are on the keyboard and the mouse; their minds are on the content. The students must think and manipulate; they are not just watching animations or simulations.
We put all of this material together in a package which includes written materials. Some people tend to believe that if you use the computer, everything will be on the computer. We do not do it that way. The students use work sheets. The important part of these sheets is not the words; it is the blanks between he words. The students are expected to write something on those blanks. So, the students, read, write, do activities, and work with the computers -- all in one integrated approach.
Device Orientation
Sometimes quantum mechanics is taught in such a way that students learn some quantum mechanics and never know what it is good for. We did not want that situation, so we decided to introduce some devices that are quantum mechanical. Students should recognize these objects and see them in their everyday life. The light emitting diode (LED) is one. They are everywhere. Although students do not know the name, they have seen them. By explaining the properties of LEDs the students learn that LEDs are different from other light sources.
We occasionally use devices that students may have heard about and may have seen pictures of, but they certainly haven't encountered. The scanning tunneling microscope is the best example. We don't expect students to use a scanning tunneling microscope although it is possible for students to build one. The students that we are addressing are not likely to be able to build such a device. So, in this case, we use a combination of a simulation and an interactive program.
We also use a variety of solid light sources. Infrared detector cards are a rather interesting example. They are fairly recent development -- at least fairly recent for inexpensive versions. TV repair people need to know if a television remote control is emitting infrared. How can they do that? It is rather simple if they have a video camera. The camera responds to IR and shows a bright spot where the IR is emitted. So, every TV repairperson needs a video camera, and he/she can find out whether there is light coming out of the remote control. But that's rather expensive. Another way to detect IR is with rattlesnakes, which are sensitive to infrared. So, every TV repairperson could have a rattlesnake. But that is rather expensive in a different way. However, one can buy, for about US$ 5-6, a little card that responds to IR by emitting visible light. Thus, it absorbs low energy light and emits higher energy light.
In this paper I will not present details about the IR card. However, I will give you a hint about how it works. An IR detector will not work if it has been in the dark for a long time. If it is then exposed to visible light it will start detecting infrared.
The Star Trek Transporter is also a quantum mechanical device. I know that because I read the Star Trek Users' Manual. I found that the Transporter has a component called a Heisenberg Compensator. When one of the writers for Star Trek was asked, "How does the Heisenberg Compensator work," he responded, "Very well." I am told in one program it failed, but I have never seen that program.
These and several other devices are introduced to students. In each case we show how the devices are related to quantum mechanics. Further, the students learn how the devices work at the atomic level.
Instructional Units
The Visual Quantum Mechanics instructional units are relatively short. Each one requires approximately 10 hours of class time. And, they can be inserted in various places within the physics course --- not just at the end. Solids & Light concentrates on the LED; Waves of Matter introduces atomic spectra and the basic wave properties of matter; Seeing the Very Small concentrates on the scanning tunneling microscope, and Luminescence: It's Cool Light looks at many different light-emitting devices. In this paper I will concentrate on the Solids & Light and The Waves of Matter units.
The Solids & Light Unit
Solids & Light is our longest unit and requires about 12 hours for the students to complete it. However, it requires that the students have very few prerequisites. They need to know conservation of energy, that light is a form of energy and how to record a voltage in a circuit that has already been made for them. We do not care if they know what voltage is. We say voltage is related to a measurement of energy. That is all they need to know for this unit. The students' circuit has a battery, a place to put LEDs, a place to put an incandescent bulb, terminals to connect a voltmeter, a little potentiometer (called a trimmer pot in the electronics business), and a resistor to keep students from burning up LEDs.
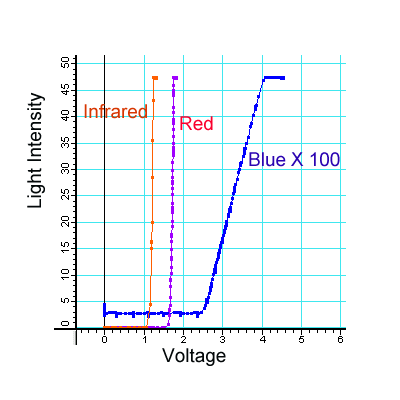
The students begin by exploring the response of the LED to energy (voltage) changes. As they increase the voltage across the LED, it turns on. The students determine the minimum voltage for each LED to turn on. They discover that the color of the LED determine the energy at which it turns on. Infrared LEDs require the lowest energy, red the next lowest, and so on to blue, which requires the most energy. (See Table 1) They also look at and record the spectrum of the LED.
TABLE 1: The threshold voltages for
LEDs.
|
The students also notice that the way in which the LED is put in the circuit is important. If they put it in backwards, it doesn't work. In class I just say, "Work with the LEDs." Randomness being what it is, for 50% of the students the LED will not turn on. They will say, "It's broken." And I say, "Look at your neighbor's. If your neighbor's is working, see if they did anything different from you." Eventually, they notice that the connecting wires are different lengths. They know that the manufacturer must pay more to make one wire longer. They understand capitalism well enough to know that the wire would not be longer unless there is a reason for it. So, they eventually figure out that the different lengths of wire are related to a preferred way of putting the LED in the circuit.
The type of data is similar to that shown in Figure 1. We do not actually have students take this curve. I did it using Pasco sensors and measuring voltage against light intensity. The students measure the threshold voltage. As these graphs depending on the color of the light determine that voltage.
FIGURE 1: Light intensity vs. voltage for three LEDs
We ask the students, "How does this compare to other lights?" We provide them with incandescent lamps that are used on Christmas trees in the U.S. These lamps are small, different colors, and very inexpensive (particularly if you wait until after Christmas to buy them). They have color, but, we ask, how are they different from the LEDs? The students will see some differences in the red and blue threshold voltages though the differences will be relatively small and they will be randomly ordered by color. These incandescent lamps are clearly different from the LEDs.
Students then do these comparisons. They find that the threshold energy depends on the color for the LED but not for the incandescent bulb. The direction that the LED is placed in the circuit is important but only for the LED. One obtains from an LED that is clear, a colored light, but with the Christmas tree light, one knows what the color is before ever starting.
We actually did not have the last item in our original set of materials but the students pointed it out to us. They thought that was important, and it is important because it says that the material emitting the light is somehow different for each LED. The color comes from the light emitting process, not from paint or dye.
We originally thought that students would notice a difference in how LEDs and incandescent lamps turn on at the threshold voltage. My graduate assistants said that the incandescent bulb turns on very slowly. That is true for some lamps if I change the voltage slowly. However, for Christmas tree lights, students in our field test did not see that difference. Both my graduate assistants argued that the difference was observable. So finally I did the comparison in Figure 2 with the PASCO equipment to find out and it turns out this isn't a very good reason. We only see a small difference in the threshold behavior of incandescent lamps and LEDs, but it is not something one would see by observing with an eye. We do not want the students to use expensive equipment here. So, we have essentially dropped that part.

FIGURE 2: Light Intensity vs. Voltage for Christmas Lights
This activity takes the students an hour or more. They see, from their hands-on experiments, that LEDs are quite different from ordinary light sources. Now, we have to make a step back because it is a little difficult to jump directly into solid state physics. So we say. "An LED is a solid device." (They have to believe us on that statement.) Solids are more complex than gases, so we will continue by looking at light from gases.
The next hands-on activity is to look at spectra of gases. Then we introduce the idea that this light is energy coming from the atom. We ask, "What do we learn from the fact that a spectrum of a gas is discrete while the spectrum of the LED was continuous?" To relate it to energy in the atom we have developed a computer program (Figure 3).
Before using this program, the students do the hands-on experiment. They observe and record the spectra. Then they use this program which simulates the spectrum. They "do" the experiment just like they did it before so they have to put the spectrum tube in the power supply and out comes the spectrum. We have introduced the concepts that atoms change energy to emit light. Now they are supposed to create energies and transitions so they can recreate the spectrum.
We have observed an unusual first step for a wide range of students. They say, "I see that I have a line at 1.9 eV. (The negative numbers don't seem to bother them.) So, I will move an energy level to -1.9 eV. Then, I will have created one line in my spectrum."
We have seen this approach in secondary students and university students. I had the pleasure of teaching an advanced physics course one day in a Gymnasium in Germany. Out of about 6 students, half of them thought that this approach would work. They told me, I didn't ask them. We haven't done as careful research as we needed but this is actually the reason we developed the program. Many will say, "The program is broken; it is not showing me a spectral line." We say, "Remember what we talked about," (transitions). Eventually they do and realize they do need to add a second energy and a transition as is shown on the right side of Figure 3.
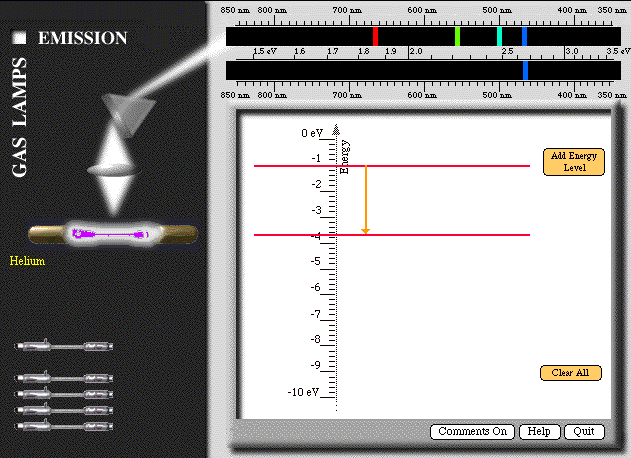
FIGURE 3: A screen capture from
Spectroscopy Lab Suite. Click here
or on the image to run the program. (Requires Macromedia
Shockwave plug-in![]() and a Web connection)
and a Web connection)
At this point, one of several things will happen. In fact all of them will happen in a class with 20 students. Some students will start all of their transitions from one initial state and have different final states. Other students will choose one final state and have different initial states. A few students will end up with six different states, each one having a separate transition. In class I have them walk around and look at each other's computer screens. They see how their model differs from others. Then, I challenge them to discuss which one is right based only on the information that they have from this experiment. Someone always says, "Going to one final state is right, and the final state is supposed to be at 3.4 eV." I will say, "Well how do you know that?" The response usually is, "Well, the chemistry teacher told me it was right."
One of our objectives is to discuss models. Based on the information that they have now, they do not know which of the models one is correct. They only know that the transitions are important. If one student has a large number of transitions with many different energy levels, then the teacher might be able to say, "Oh but there will be another transition between this one and that one which you didn't draw. That spectral line will be visible but we don't see it." So, some possibilities can be eliminated but many cannot. The idea of what a model is and what is acceptable based only on the information that one has is an important part of what we are doing.
One of the next steps is to attempt to build the LED spectra, a band of colors instead of individual lines. The students use the same program but place energy levels so that they create a band instead of individual lines. They learn that they need a large number of states very close together. Once they have done that activity, they use a program shown in Figure 4. Here, they can manipulate the width of the bands and the energy gap between the bands. Then, they match the spectra of the various LED. With this program they see how the light from the LED depends on the band gap and the width of conduction and valence bands.

FIGURE 4: The energy bands and gaps from the LED Spectroscopy program. Click here or on the image to run the program. (Requires Macromedia Shockwave plug-in and a Web connection)
Now the students have seen why solids emit colors and how the colors depend on the properties of the solid. They still need to explain the directionality and the turn on voltage. We have another interactive program that addresses these issues. The students virtually repeat the experiment that they completed as the first exploration. The computer experiment has a voltmeter, a battery, a voltage control and LEDs. So, they are manipulating all the variables that they did in the real experiment. The program has an added feature. On the screen are the band gap, the conduction band, valence band and the spectra. So they repeat the experiment and see how these properties change as they vary the magnitude or direction of the voltage. That is a little hard to do with a real hands-on experiment. So we have to do it with a computer.
Now, we have come back to where we started. "What are these LEDs and why are they different from the rest of the light emitting devices in the world?" By using hands-on experiments and hands-on interactive programs the students have gathered all of the information to understand the LED.
The Waves of Matter
Another unit, the Waves of Matter, teaches some basic concepts of waves. This unit is similar in some ways to the material that you might find in a beginning quantum mechanics book when the author introduces one-dimensional quantum mechanics. The biggest difference is that we do it without most of the equations. We do present the de Broglie equation, but not Schrödinger's Equation.
The students start by observing atomic spectra again. Then the next step is to observe interference of light by using a double slit. Next, we move to particles and double slits. We do not expect most students to have an electron diffraction machine available, so we have a simulation (Figure 5). The students play with this program and explore changes in the interference patterns. From that program and from doing the one I've shown here and one other.
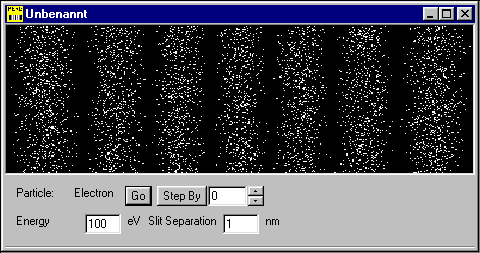
FIGURE 5: A screen capture from the electron interference program. Click here or on the image to run the program. (Requires Macromedia Shockwave plug-in and a Web connection)
So, we get the students to the point where they say, "There is a wavelength associated with the electron and it varies inversely as the energy." Then, we introduce the equation l = h/p. We do not expect them to go further than that. As an application we introduce the electron microscope. Then, they can get on the Web and look at all sorts of pictures.
Next, the students work through an activity about interpreting wave functions in terms of probabilities. One of the most important activities is an introduction to sketching wave functions qualitatively. They work with only one dimension, and we introduce some steps that allow them to sketch wave functions without solving a differential equation. The idea here is much the same as it is in a one-dimensional quantum mechanics course. We discuss continuity of the wave function across a boundary (except we use the phrase smoothness across the boundary). We use the same argument that we have already established -- that the wave function is related to the probability as seen through the diffraction. If you come at a boundary from both directions, you expect the probability of finding the electron at that point to be the same whether you come from the left or the right.
We do not just state these concepts but work into them by looking at the physics of the situation in much the same way that one would do this with a group of students who understand the mathematics. However, we use a different language, and we talk about the concepts in words rather than equations.
Then, we ask the students to sketch wave functions qualitatively. Some sketching can be done with paper and pencil. But, we find that it is very easy for the students to be very inexact with paper and pencil, and there are some points where exactness is needed. So, we have created a program that does very little except that it allows the students to vary the wave function and match boundary conditions (Figure 6).
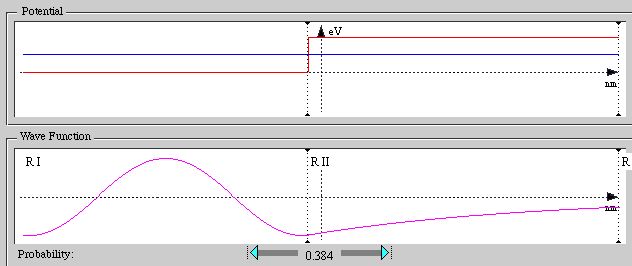
FIGURE 6: A screen capture from Wave Function Sketcher. Click here or on the image to run the program. (Requires Macromedia Shockwave plug-in and a Web connection)
We have discovered some interesting ways in which the students use this program. First, if we tell the students that the wave function is smooth, they will make it smooth to many derivatives. The idea that two functions just stick together does not occur to them. Second, on is the use of the word "decreasing" for exponential decay. When we use "decay," the students immediately think of radioactive decay. They interpret that to mean that the electrons are radioactively decaying in the region where the total energy is less than the potential energy. So, we use the phrase "decreasing wave function."
Once the students complete the activity they can study tunneling. We introduce tunneling by cutting off a step potential to create a barrier. Then the students work on smooth wave functions at both boundaries. They say, "Oh, this is weird." Then we have to explain that it really does happen.
Finally, with the same program they find that if they pick a random energy in a square well, the wave function does not fit. They get the functions matched up on one side, then try to meet the conditions on the other side. They can't do it (Figure 7). Once they have done this activity, they finally get to Schrödinger's Equation. They never see the equation. The machine solves it and shows solutions for bound states. (Figure 8) They can also search for acceptable energies. This program is more standard.
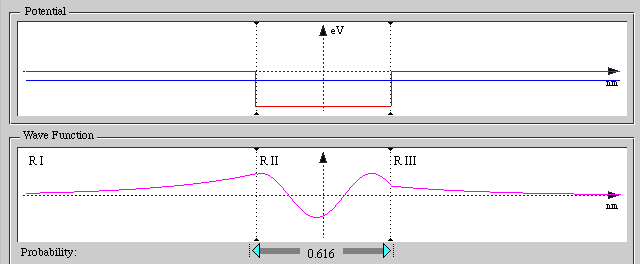
FIGURE 7: An attempt to sketch a wave function for a well. For this wavelength the student cannot obtain smoothness at both boundaries. Click here or on the image to run the program. (Requires Macromedia Shockwave plug-in and a Web connection)
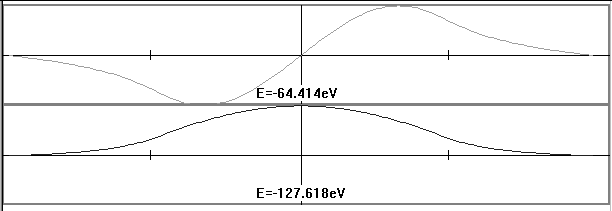
FIGURE 8: The display of two acceptable wave functions from the Bound States program. (This program cannot be run interactively on the Web.)
With this program we have reached the goal of the activity. We started by asking, "Why do atoms have discrete energy states?" After a series of hands-on activities they student sees the reason -- electrons sometimes behave as waves.
Other Instructional Units
Two other units treat other aspects of quantum physics. Luminescence: It's Cool Light guides the students through activities about a large number of different light sources. The emphasis is on quantized energy states and energy bands and gaps. Seeing the Very Small focuses on quantum tunneling as it is applied to the scanning tunneling microscope (Figure 9). The students see how tunneling can be used to map atoms on a surface and to move atoms one at a time.
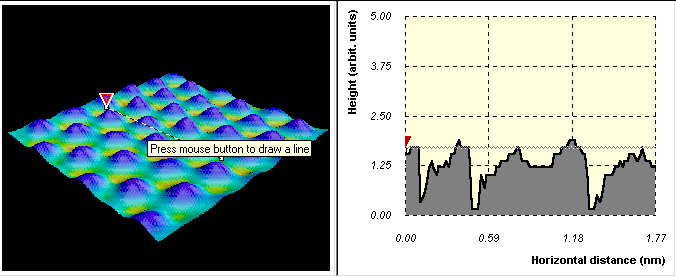
FIGURE 9: The Scanning Tunneling Microscope program helps students learn how to create a surface profile by using the tunneling effect. (This program cannot be run interactively on the Web.)
In addition to the quantum physics units we have created two instructional units which provide background information. Potential Energy Diagrams uses magnets and mechanical devices to help students understand these diagrams while Making Waves introduces the basic concepts of wave motion.
Evaluation
Does Visual Quantum Mechanics work? The units are being used in secondary schools and in colleges throughout the U.S. and in a few other places. Actually, we do not know all the places that it is being used because all the material is on the web and people download it. I know that we have given materials to people in Southeast Asia and throughout various parts of Europe as well as the U.S. Most of our reports, however, have come from the U.S. Students' attitudes toward these materials are really positive. They frequently make comments like, "I really like this better than our regular physics. Can we keep doing it?" (We don't tell the instructors that.) Our staff have observed teaching using the materials in a variety of different schools. The students are positive; they interactive with the materials and each other; and they seem to be learning. Most of the teachers are also positive. A few are not. We certainly have the problem that many teachers do not have a very strong background in quantum mechanics. Even though we are approaching quantum mechanics in a much different way than it is normally taught, some teachers still feel uncomfortable. Building the teachers' confidence is very important. That's something we need to work on more. We hope to be working with some folks in Europe on this aspect.
Student learning was rather good. We are now revising all of the materials in hopes of making it even better.
We had some teachers who decided that it is too much trouble to have the students work in a hands-on mode with all of these programs. So, they just show the programs to the students. In these cases learning went down; attitudes went down; everything went down. Hands-on activities make a difference. Of course we should not be surprised because we built the material for the students to use; not for the teacher to talk about. Overall, it seems to be working rather well. We think it will work even better as we revise the materials
Availability
All of the materials are available on our web site. You can install the programs directly from the web site by choosing Visual Quantum Mechanics in the menu. The printed material is available in Adobe® Acrobat form. You can get all of the materials from our Web site.
Acknowledgements
The work described here is supported by the U.S. National Science Foundation under grants ESI-9452782 and DUE-9652888. My co-workers and students completed much of the work in developing and evaluating the instructional units. Materials were created by Sanjay Rebello, Larry Escalada, Robert Grabhorn, Abby Dimitrov and Gabi Mihalcea. Heidi Gruner, Larry Escalada, and Sanjay Rebello collected most of the evaluation data. Chandima Cumuranatunge has created the vast majority of the computer programs.